Table of Contents Show
One of the most critical and often overlooked tasks in RVing is leveling your RV. Leveling systems can help make this easier, but you can’t pull up to every site and start leveling.
Watching some RVers level their RVs is like watching an artist paint a masterpiece. It’s a process that takes time, and the small details make a significant difference.
Today, we’ll look at the art of leveling. Let’s get started!
How Important Is Leveling Your RV?
You want your RV to be as level as possible when using it. An unlevel RV can result in an uncomfortable place to sleep. Having a level RV is far more important than just your comfort, though.
An RV needs to be level for the slides to operate correctly. When an RV isn’t level, it can cause strain on the mechanics of your RV’s slides. This strain could result in jams and failures or make it difficult or impossible to retract or extend your slides in the future.
Your propane system, mainly your refrigerator, runs most efficiently when level. Due to how these systems cool, they need to be as level as possible. If not, you may notice that the temperatures will slowly start to climb. You risk ruining any temperature-sensitive food in your fridge when it’s not level.

How to Level Your RV Properly
If you’re having trouble leveling your RV, we’ll walk you through the process. Like many forms of art, you’ll develop your leveling skills the more you practice. Commit these steps to memory and make a physical checklist if necessary.
First, Scan Your Site
Don’t be in a hurry when you pull up to your campsite. Check for any obstacles, holes, or unlevel portions of the site. If you’re camping in a campground, they’ll do their best to provide a level campsite, but that doesn’t guarantee perfection. Trust us; we’ve seen some incredibly unlevel campsites in our days.
If you’re boondocking, you may have a bit more flexibility in where you place your rig on the site. Finding the optimal place for parking your rig can save you a lot of frustration later on in the process.

Back In and Check Your Level
Now that you’ve inspected the site, you can start backing in. Position your rig on the spot that looks best to you. It’s wise to look around and make sure there are no obstacles that will prohibit you from opening any of your slides or awnings. If you can’t open up your RV slides, your levelness will be the least of your worries.
After confirming there are no obstructions, check the levelness of your RV. Use a bubble level or an RV leveling system. These will give you the best indication of how you might need to adjust your RV. It’s never a good idea to try to eyeball it, as your eyes can play tricks on you.
Pro Tip: Work smarter, not harder. Here are the 5 best bubble and bluetooth RV levels →
Add Leveling Blocks, If Necessary
If a bubble level or RV leveling system indicates that you’re unlevel, there are some tools you can use to fix that. Camco and Andersen make products that make leveling incredibly easy in most circumstances.
Camco’s tool is its Lego-like bricks that can stack on top of each other. You can then drive your RV tires up onto the blocks to help lift your rig. Andersen makes crescent-shaped blocks that can provide up to 4” of lift for a particular side of your RV.
Pro Tip: Check out our comparison of the Camco and Andersen levelers to decide which is right for you.
Get your RV as level as possible before unhitching or initiating any RV leveling systems. This helps ensure you’re not overworking your system or lifting your tires off the ground.
Disconnect Your RV
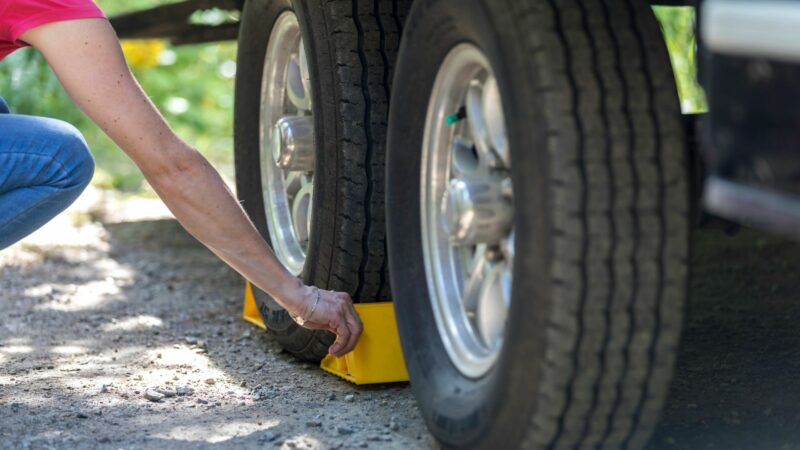
With your RV now as level as possible, chock your tires. We strongly recommend getting the chunky rubber chocks sold at most big box home improvement stores. They’re relatively inexpensive but strong enough that they’ll stop your RV if it starts to roll. If put to the test, some of the lesser-quality plastic chocks would stand no chance against a beefy RV.
Now that your wheels are chocked, you can start disconnecting your RV. The process for disconnecting your RV will vary depending on the type of RV you have and the hitch you’re using. This is an important and dangerous part of the process. A mistake here could be costly and result in injury or death. Make sure you follow the correct steps for your trailer and take the proper precautions.

How to Manually Level Your RV
Many travel trailers and older fifth wheels require you to level them manually. If you followed our advice and got your RV as level as possible side to side, you’ll only have to worry about front to back now.
For a travel trailer, you’ll use the tongue jack to raise and lower the front of your RV. You’ll raise and lower the front leveling jacks for a fifth wheel. Once the RV is level, you can bring down the stabilizing jacks. These jacks aren’t meant for leveling but help absorb some of the typical bouncing in RVs. So don’t put too much weight on your stabilizing jack, or you could risk damaging it.
How to Auto-Level Your RV
If you’re lucky enough to have an auto-leveling system, you’ll love it. You still want to get your RV as level as possible, but auto-leveling can save you a tremendous amount of work. Once your RV is as level as possible, initiate the leveling system.
Auto-level systems will lower the front of your RV first. It will look for the lowest level it can go to achieve level. It will then automatically raise and lower jacks around your RV to maximize the levelness and lower any stabilizers. These systems can be advantageous, but you want to set them up for success by starting as level as possible.
Can You Add Auto-Leveling to an RV After Market?
If your RV didn’t come with auto-leveling, we have good news for you. Lippert Components Inc. is one company that creates an after-market leveling system. Its Ground Control 3.0 and Level Up systems work with most fifth wheels and travel trailers.
Keep in mind that these systems require professional installers. It should be no surprise that these systems aren’t cheap, including when it comes to installation. The components alone cost $3,500 to $4,000, and you’ll then need to tack on hours upon hours of professional labor.
Accessories to Make Leveling Your RV Easier
There are a handful of accessories that will make leveling your RV as easy as possible. If you’re preparing to buy an RV or are struggling to level your RV, we highly recommend adding a few of these items to your cart.
Lynx Levelers
- Lynx Recreational Vehicle Leveling Kit, 10/Pack
- Modular designed levelers not only configure to fit any leveling function, but they also withstand tremendous weight
Some products are recommendations, but some are requirements. These levelers are multi-purpose accessories and should be a required piece of equipment for all RVers. Stacking these levelers on top of each other can help you raise the low side of your RV by several inches.
By stacking these blocks on top of each other, you’re also reducing the amount of space between the ground and your jacks. By minimizing the amount of extension from your jacks, you’ll experience more stability and reduce movement in your RV. These are one item that you can never have too many of. So while you may start with one packet, you could end up using two or three sets.
Bubble Level
- Percise and on point
- Optional screw holes for permanent mounting on trailer hitch
Even if you have an auto-leveling system, it’s a good idea to have a bubble level on hand. Technology can fail, malfunction, or just have a mind of its own. Sometimes it’s best to abandon technology and go back to the simpleness of a standard level. Some RVers even mount bubble levels to the side of their RV to make it as easy as possible to confirm their RV’s levelness.
RV Chocks
- Compact Size: Measuring approximately 8 inches in length, 4 inches in width, and 5 inches in height, these wheel chocks...
- All-Weather Construction: Built for durability in any climate, these wheel chocks feature all-weather construction,...
This is another required piece of RVing equipment. You should never unhitch your RV without chocking the RV’s wheels. If your wheels aren’t chocked, your RV can roll right out of your campsite. In the worst-case scenario, it won’t stop until it runs into something sturdy enough to stop it. This can cause massive damage to your RV and anything in its path.
Don’t settle for cheap plastic chocks, especially if you have a larger RV. The small plastic chocks may do the job for a small tractor or flatbed trailer, but they’re no match for trailers the size of most travel trailers and fifth wheels. If put to the test, they’ll likely end up flat as a pancake as your RV rolls away.
LevelMatePRO Wireless Vehicle Leveling System
- EXCLUSIVE, USER-FRIENDLY APP AND FEATURES: LevelMate is the only device that can display level positions from both...
- FUSS-FREE LEVELING: LevelMatePRO is an essential RV accessory that saves you time for leveling. It provides real-time...
If you like technology and enjoy the idea of being able to check the levelness of your RV without getting out of the driver’s seat, LevelMatePRO is for you. This unique system uses Bluetooth technology and an app to help you level your RV. This tool is especially helpful for finding the most level spot at a campsite and knowing how many leveling blocks you need to use.
The weather doesn’t always cooperate when you’re parking your RV. You may arrive at a campsite, and it could be raining. This can require that you get in and out of your vehicle multiple times in the rain to find your RV’s optimal placement. The LevelMatePRO would allow you to avoid this situation by checking the levelness from within your RV.
RV SnapPads
- SIX-POINT RV LEVELING SYSTEM: SnapPad XTRA 6-Pack RV leveling blocks work with a variety of RV types including Fifth...
- PERMANENT: SnapPad leveling blocks can be installed in minutes but will stay on forever. Snap on these must-have camper...
It’s always wise to place something under your leveling jacks; some places even require it. RV SnapPads cover the landing gear of your RV leveling system and protect it from getting beat up during your travels. The thick rubber also reduces the space between your landing gear and the ground to provide more stability. The rubber material also provides some grip to prevent slippage during hitching and unhitching. They make several different styles and sizes and can fit practically any RV landing gear.
Practice Makes Perfect
The adage “practice makes perfect” applies to leveling your RV correctly. The more you can practice, the easier it will become. What was once a laborious chore will be second nature before you know it. Learn what works best for you. Make a physical checklist if necessary and take it slow. You’re more likely to make a mistake or get hurt when you’re in a hurry.
What do you think is the most frustrating part of leveling an RV?
Last update on 2024-10-22 / Affiliate links / Images from Amazon Product Advertising API


