


Table of Contents Show
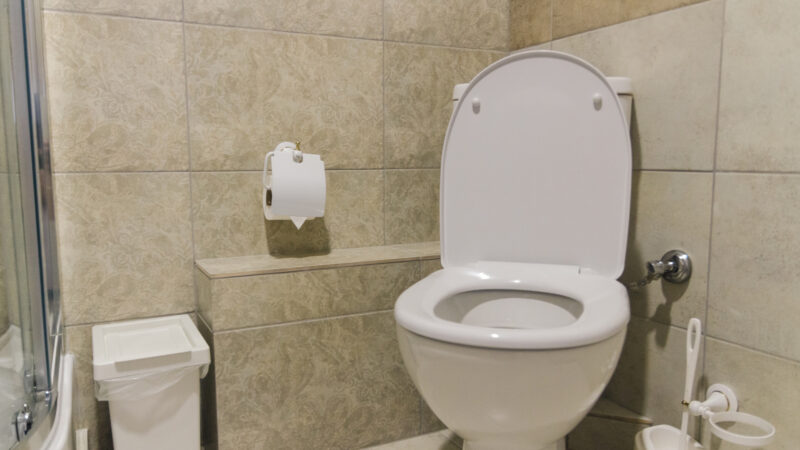
If you’ve ever sat on a standard RV toilet, you most likely felt the difference compared to a residential toilet. Most manufacturers use the cheapest toilets in their rigs because they know many RVers don’t care.
However, if you’re tired of battling cheap RV toilets, porcelain might be the way. But can you put a porcelain toilet in an RV?
Today, we’ll walk you through how to upgrade your cheap RV toilet so you can enhance the look of your RV and your overall experience. Let’s get started!
What Material Is Used for RV Toilets?
Plastic is the most common material for RV toilets. It allows the manufacturer to create the cheapest and most lightweight toilets for their rigs.
However, larger, more residential rigs with more cargo capacity will upgrade the RV’s toilets to porcelain. A porcelain RV toilet has a different look and feel than the cheaper plastic versions.
How Do RV Toilets Work?
Unlike residential toilets, RV toilets do not have a connecting tank that stores water for flushing. Instead, RV toilets rely on assistance from gravity to help the waste travel from the toilet to the RV’s waste tank.
To flush the toilet, use your foot to press down on a foot pedal at the base of the toilet. Pushing the pedal partially down runs water that will fill the toilet bowl.
However, when you press the pedal fully to the ground, the bottom drops out of the toilet, and gravity forces the waste through the RV’s plumbing system.
Depending on the rig, the waste tanks to store sewage can be 15 to 100+ gallons. Once they’re at capacity, you’ll need to empty them. This means either accessing a sewer connection or finding a dump station to empty your tanks.
Can I Put a Porcelain Toilet in an RV?
Putting a porcelain toilet in an RV is relatively simple. Anyone with basic DIY skills can replace their cheap plastic RV toilet with a porcelain toilet in an hour or two.
However, you must be mindful that a porcelain toilet can weigh twice as much as a standard RV toilet. If you’re already worried about weight in your rig, adding a porcelain toilet might not be a good idea.
Benefits of a Porcelain RV Toilet
Whether you’re on the fence or need to convince your spouse to upgrade to a porcelain toilet, several benefits exist.
Here are some reasons we think it’s one upgrade worth making in your rig.
More Sturdy/Stability
A standard plastic RV toilet typically has a weight limit of 250 to 300 pounds. Even if you’re within the weight limit, an RV toilet can feel flimsy. You may even find yourself crossing your fingers that something doesn’t break.
On the other hand, a porcelain RV toilet can hold up to 1000 pounds and provides a much sturdier experience. You won’t worry nearly as much about feeling like you’re on the verge of breaking something every time you sit down.

Easier to Clean and Keep Clean
Cheap plastic RV toilets tend to stain easily and absorb smells. The plastic material can stain from rust and other gunk in water. The longer you own and use your RV, the more likely you’ll experience discoloration and less-than-stellar odors.
The porcelain materials are much more resilient to staining. Since they often have a clear coating for their top layer, they don’t absorb odors.
While you don’t want to put harmful chemicals into your plastic RV black tank, you don’t have to worry as much about the chemicals you use to clean your toilet causing damage.
Creates Residential Look/Feel
A porcelain toilet can radically transform a space with a much more residential feel. If you’re looking for a home away from home or to hit the road and travel full-time in your RV, a porcelain toilet is a way to go.
One of these toilets makes a bathroom space look more polished and luxurious than a cheap plastic RV toilet.
Steps to Install a Porcelain Toilet in an RV
Installing a porcelain toilet in an RV is incredibly easy. It only requires a few tools and an hour or two of your time.
Let’s walk through the steps to install a porcelain toilet in your RV.
Choose Your New Toilet
There are several options when shopping for a porcelain RV toilet. Dometic is one of the primary players in the game for RV toilets and other camping gear and accessories.
We’ll share a few excellent options, so don’t be surprised if you see the Dometic name come up again in this article!
Before selecting your new toilet, you should do some measuring. You want to know how much space you have to work with and that the new toilet will fit.
Don’t forget to factor in the legroom you’ll need when sitting. Make sure any toilet you purchase not only works with your RV setup but also that you have plenty of space for it.
Remove Old Toilet
Once you select your toilet, you’ll need to remove the old one. However, before you start unscrewing and removing things, empty and clean your black tanks as much as possible.
Flush them out a time or two to eliminate as much waste as possible. You’ll have a giant hole in the ground that leads directly to the black tank, so you want to minimize the smells as much as possible.
Once the tanks are clean, shut off the water to your RV and ensure the water pump is in the off position. You will then need to use a pipe wrench to disconnect the water line running to the toilet. Have some towels or a bucket to help catch any water in the system.
You can then remove the caps at the base and start loosening the bolts that secure the toilet to the ground. The old toilet should lift up and out of the spot once you remove them.
Just ensure that nothing accidentally falls through the hole in the floor and into your black tank.
Keep in Mind: What Is a Shower Toilet Combo in an RV? Click the link to find out!
Install New Toilet
With the old toilet gone, this is an excellent opportunity to clean the floor and the hard-to-reach spaces. Next, set the new toilet in the same place as the old plastic one.
If you’re lucky, the bolts will line up, and you’ll quickly secure the toilet seat. If not, you’ll have to create new holes to secure the toilet to the floor.
Once complete, use the bolt covers to hide the bolts and provide a polished look. You can then start attaching the water line to the new toilet.
Make sure it’s snug, but don’t put too much muscle into it. Many have plastic pieces that can break if you apply too much force. Have someone turn on the water while you sit and watch for leaks.
Keep in Mind:
Porcelain RV Toilets
Several excellent porcelain RV toilets are easy to install in an RV. We’ve found a few that are most commonly in RVs. If you want to upgrade your cheap RV toilet, consider one of these options!
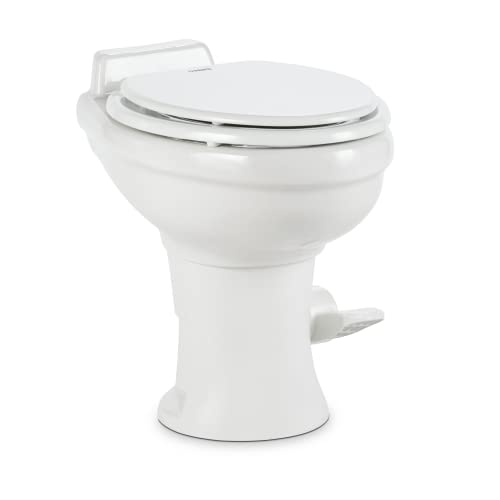
Dometic 310 Gravity Toilet
The Dometic 310 Gravity Toilet is a round-shaped ceramic toilet weighing 39 pounds. It features a slow-closing lid, so you don’t have to worry about it slamming and damaging your toilet and making noise.
The unit features a new PowerFlush technology that nearly mimics the flushing of a residential toilet and helps keep it clean. It only uses a pint of water per flush, so it’s excellent for those worried about wasting water in their RV.

- INNOVATIVE DESIGN: The Dometic 310 toilet is a full-size and lightweight model, which is ideal for modern RVs. It has a...
- EFFICIENT FLUSHING SYSTEM: This toilet uses a pressure-enhanced "PowerFlush" rim wash system that clears the bowl...
Dometic 320 RV Toilet
The Dometic 320 RV Toilet provides at-home comfort in your RV. The intuitive design makes it convenient, and the unique rim ensures the mess stays in the bowl. At 36 pounds, it’s incredibly sturdy and durable for your RVing adventures.
The ceramic bowl and wood seat will have you thinking you’re using the restroom in a sticks-and-bricks house instead of an RV. When nature calls, you won’t have to worry about answering it with this toilet.
- Full-Size Residential Style Wood Seat
- Deep, 100% Vitreous Ceramic Bowl
Aqua Magic Style II RV Toilet
The Thetford 42060 Aqua Magic Style II is a high-profile toilet with water-saving features. This is a full-size residential seat with a more compact design than most RV toilets. However, it still provides the residential look and feel of an RV bathroom.
The unit weighs only 34 pounds and is incredibly easy to install. It features a powerful flush to help ensure everything washes into your RV’s black tank.
Thetford is a reputable name in the RV, boat, and truck industry regarding products dealing with waste. They’ve honed their craft and created high-quality products you can trust.
Keep in Mind: Poo in Privacy With These Portable Toilets for Camping!

- 2-in-1 Flush System: The single-pedal flush system has 2 functions: press the lever halfway to add water to the bowl and...
- The Comfort Of A Household Toilet: The full-size customizable residential seat and the compact seat height gives the...
Upgrade Your Throne to Porcelain
If you regularly use the RV bathroom, you’ll want to upgrade to a porcelain toilet. It’s much less hassle to clean, and you don’t have to feel like gambling every time you take a seat.
The cheap plastic RV toilets can do the job if you only take a few weekend trips each year. However, if you’re spending significant time in your RV, this is one RV upgrade worth considering!
Are you planning to upgrade your RV toilet?
Last update on 2025-07-12 / Affiliate links / Images from Amazon Product Advertising API

If a man will be using that new toilet and there’s room, get an elongated toilet instead of a round toilet. It will be much appreciated. After you shut off the waterpump, first release the water pressure by flushing the toilet which helps with loosening the water supply line. Also, you don’t need a “pipe wrench” to disconnect the water supply line to the toilet, just use a pliers. Most of the time the supply line can be unscrewed by hand. Over tightening the water connection can destroy the pipe seal. At this time, if you’re a DYI person you can install a shut off valve in the supply line to the toilet. A 1/2″ sharkbite inline valve for Pex is the easiest to install.