


Table of Contents Show
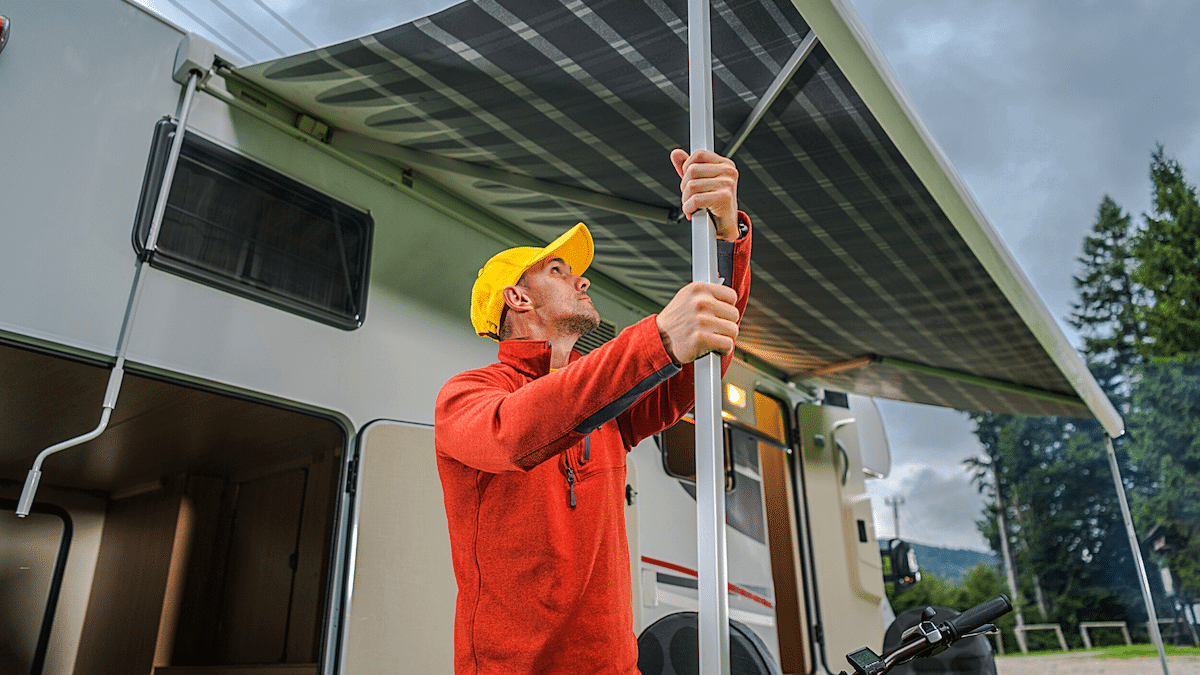
One of the most useful parts of a recreational vehicle is the awning. It provides instant shade on camping adventures and actually creates a designated outdoor living space next to your vehicle. So it makes sense that you would want to keep it in good repair. By inspecting the awning often you can address any damage issues immediately and prolong its life and your enjoyment. Learn how to repair your RV awning yourself below.
What Causes Awning Damage?
Damage can come in many shapes and sizes with numerous causes. You may find that your awning has a small tear from a tree branch, or mold and mildew left untreated that can actually rot the fabric in an awning. Wind can also be a big factor in damage, ripping the awning from its housing or bending the awning supports. Even constant exposure to the sun can not only fade the fabric, but its threads will stretch and become weak, creating holes and tears.

Assess Damage
It is always good to discover these imperfections before a big camping trip, rather than at the campsite during a rainstorm. Make it a practice to add an awning inspection to your pre-camp checklist. You will want to look at both the underside and the top of the material, so make that trip to the roof to get a good visual assessment.
Types of Damage
You may find anything from small holes and tears to larger ones when you inspect the awning. Anything less than 3 feet long can usually be repaired without professional ‘intervention’ or replacement. So put your DIY hat on, and let’s look at how to fix your awning!
Steps To Repair Your RV Awning
- Start by thoroughly washing the awning. You will need a spray bottle with 4 parts water to 1 part dishwashing soap, or if you have problems with mildew or mold use 10 parts water to 1 part bleach. Spray the underside and top of the awning material, then roll up the awning for approximately one hour. When the hour has passed, unroll the awning and rinse the top and bottom with water, letting it dry completely.
- Remove the RV awning to repair the tears and holes. Because there is stress on the awning while opened, it would be difficult to pull sides of a tear together to patch, so lay the awning on a flat clean surface to do your repair work.
- For those smaller repairs, decide by the shape and size of the damage which of the following materials would suit your repair needs best:
- Clear awning repair tape like Gorilla tape – this can be used in long strips to hold the fabric together
- Eternabond tape, which is not clear and is heavier than clear tape, so its use is more helpful with smaller tears and holes, and it is waterproof.
- A tent patch kit, which usually consists of fabric tape that can be attached directly over tears and holes
- For repairs longer than 3 feet you have three options:
- Find matching fabric and replace holes or tears with it, using heavy-duty glue like Amazing Goop, which is water-resistant.
- Replace the entire piece of awning fabric
- Replace the awning with a new one, complete with mechanical attachments.
How to Replace RV Awning Fabric
- With the awning retracted, remove one of the end covers on the frame.
- Then tie the awning arms in place with a piece of rope on each end. This will allow you to unroll the fabric from the awning without the arms extending.
- Unroll the fabric with the manual override to crank the awning down, or if you have an automated awning, use the electric motor to unroll the awning fabric.
- Remove any stop clamps on both ends that hold the fabric into the main roller.
- Then slide the fabric out of the channel on the roller on the end where the end cover has been removed.
- Place the new awning material with vinyl cord into the channel on the back roller and the front of the material into the front extendable bar. You will need to feed them in at the same time so that the material can be slid down the awning bars together to the other end. You may need a second person to help hold the material as it is fed, because it can be a little heavy and you don’t want to rip the fabric as you feed it down the rollers.
- Make sure the fabric is centered, then place stop clamps on both ends to hold the vinyl cord in place.
- Roll up the awning.
- Untie the ropes holding the awning arms.
- Replace the end cover.
How to Replace an Awning
You will need at least one other person to complete this RV awning repair, as well as two ladders.
- Measure the existing awning roller that is attached to your rig and get the extension measurements, as well. Then order a new awning of the same size.
- Detach the existing awning components when it is retracted, taking the roller (and aluminum cover if there is one). This should include the entire awning.
- When you receive the new awning kit, measure the center of the awning rail and mark it. Then mark the center of the awning location on the outside of your RV.
- Attach awning rail with putty, lining up the center marks of the rail and on the RV. Making sure the rail is level, then attach it permanently with screws.
- Attach the arms of the awning to the roller tube assembly.
- Cover arms with athletic socks to avoid scratching the paint on your RV, then slide the fabric or metal cover of the roller tube assembly into one end of the mounted awning rail, centering it.
- Take off the socks and attach each arm, making sure that they are held up so that the roller tube is even with the center of the awning rail track.
- Straighten and remove the locking cotter pins at each end of the roller tube.
- Open the awning and attach foot covers.
- Make sure the awning is centered in the track, then install self-drilling screws at either end of the roller to hold it in place.
How to Care for Your Awning to Make It Last
Now that you’ve repaired your RV awning, be sure to follow these simple suggestions to keep it in good condition and lengthen its life:
- Clean the awning a couple of times a year.
- Roll it up when not using it, as its exposure to the sun will weaken the fabric faster.
- If you don’t have one, install an awning stabilizer kit.
- If your awning is open during a rainstorm, lower one corner so the rain can drain off it.
- Lock your awning before traveling.
- Clean your awning periodically using the steps in the video below.
Replacing an awning is pretty straight forward. The key items are understanding your awning mechanism and how to detach the tube, good ladders, and extra hands.
We did ours on our last trailer and it was pretty easy and went pretty quickly. This was due to my research on the you tube database and a wonderful set of family helpers.
You can do it!
Yes we have replaced our awning and slide topper awnings, by Tyler of Tough Top Awnings in Vancouver, Washington area. It is a family owned awning replacement business and they are First Class! I highly recommend them for all your awning and slide topper replacements! They will even ship replacement awnings to you, to install yourself if you want to? Or you can drive to their business and get them to install your awnings! Great prices and installation! Tyler is wonderful to deal with! Dec.8,2020
We use our awning all the time in t hff e wintertime because it rains alot in Washington St.. You need to make sure you tilt so the water runs off. We have had no problems with it in the wind if it to high then we do put it in. We also see a lot of people having problems I think alot of it is self inflicted. We have had 4 RV’S over the years and haven’t lost a awning yet.
We have used our awnings on this rv and the one before it. Have never had to repair or replace one. I am one that does not leave it out in wind or when we are not close by. Hate to have it get damaged from wind.
We use our awning(s) a lot on all our Rv’s over the years. Years ago we made the mistake of going into town to do some site seeing and left it down. Bright sunny day when we left. Came back that night to find it had blown up and over the RV to the other side; still attached to the correct side. We now retract it every time we leave camp.